

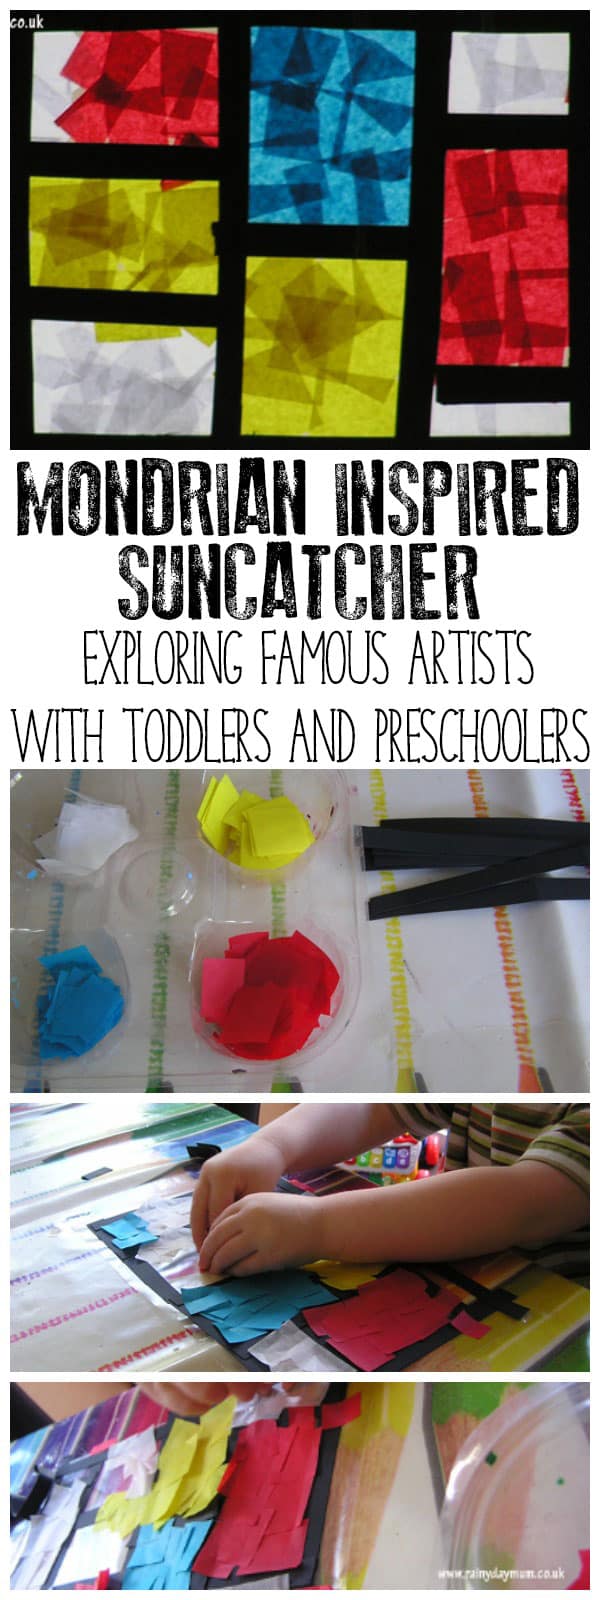
Mondrian Inspired Sun-Catcher – Exploring Famous Artists with Toddlers and Preschoolers
Toddlers and Preschoolers have a unique outlook on art – they are uninfluenced and they know what they like and what they don’t like. This age is a great time to start exploring some of the famous artists with them and we started off our look at them with Mondrian. Mondrian was one of the artists that I remember studying as part of my art classes at secondary school and his later work is ideal to use with toddlers and preschoolers as it focuses on primary colours. Red, Blue and Yellow and the art produced is bold and easily explored using different media. Here we explore some of the later works and use it to inspired us to create a Mondrian Inspired Suncatcher.

Mondrian for Kids
This activity plan for toddlers and preschoolers explores how you can use Mondrian’s Abstract artwork to review colours, shapes and explore the artist plus use the work to inspire a toddler lead art activity.
Reading Resources for Toddlers and Preschoolers
Some links in this post may be to affiliate products
We started off exploring Mondrian by reading Coppernickel Goes Mondrian by Wouter van Reek an excellent book which retells the story of Mondrians life from the landscapes that he started out painting through to the more recognisable abstract images that he later created. It’s aimed at preschoolers through to year 3/4 (3rd/4th grade in the USA) and is a fun way to look at the evolution of the artist.
Although part of the Basic Art Series Mondrian by Susan Deicher is written for students studying art and those interested in the artist we found it a useful resource to view the images created by Mondrian in large picture format where we could see what the originals looked like.
Questions to ask whilst exploring Mondrian with Toddlers and Preschoolers
Whilst we read Coppernickel Goes Mondrian and looked through the images in Mondrian as we entered the stage where his artwork became abstract we started to explore a little more about the artwork – the shapes he formed, the colours that he used and ideas about how he may have made them.
The vocabulary that we worked on was – Square, Rectangle, Line, Blue, Red, Yellow, Black, White, Big and Small.
You will find it interesting to ask where is a “Big Rectangle” in one of the pictures – with the 3 toddlers I have worked with on this all had the same response – it was a rectangle with a long top edge, and a small rectangle was one with a short top edge it didn’t matter what the height was. By the time they were approaching school age they were able to identify big and small irrespective of the positioning on the artwork.

Creating a Mondrian Inspired Suncatcher with Toddlers and Preschoolers
Contact Paper or Sticky Back Plastic
Tissue paper in red, white, blue and yellow
Toddler and Preschool Suncatcher Inspired by the Art of Mondrian
Cut a piece of the contact paper and peel off the backing – use the sticky tape to secure it to a table or desk (this is make it easier for your toddlers and preschoolers to freely create).
Have a selection of red, white, blue and red tissue paper cut up as well as some black strips of card.

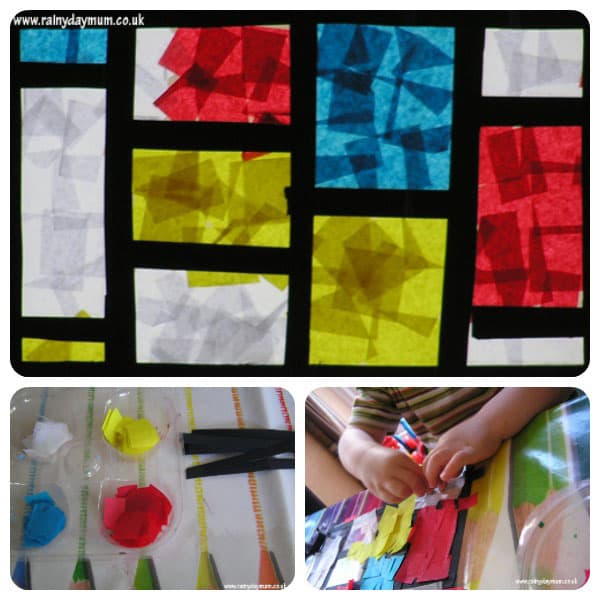
Keep out a copy of a piece of artwork by Mondrian and allow your toddler or preschoolers to lay out the black frame for the creation. The image below is my preschoolers example.

Let your toddlers and preschoolers lay out their grid as they wish, this is their interpretation of the art work – you may wish to provide some children’s scissors to help them cut up the strips of black card to the size that they wish.

Then let your toddlers fill the rectangles and squares they have created with the tissue paper.
You will find with older preschoolers that they tend to stick to filling in the blocks with a solid colour whereas toddlers will follow their own rules for being inspired by Mondrian.
When finished stick another piece of contact paper on the back and then you can afix to the window with some sticky tape.

Looking for more Activities for Exploring the Great Artists check out these ideas from Red Ted Art
Pin this Mondrian Artist Exploration for Toddlers and Preschoolers to do Later
Share this Toddler and Preschooler Art Exploration Activity Plan with Others on Facebook
I love this idea. Have done this in class not with Mondrian, though. Why have I never thought to do it at homes *kicks myself*
What a colorful piece of art your little one created! I like how you explained that we were “coloring” with tissue paper. I sometimes say that to my son, too, when we are doing something similar. 🙂
Aaah how gorgeous did this turn out? Simply lovely!!! What a great great idea. Love Mondrian.
Thank you for sharing our Kids Get Arty journey!
Maggy
LOVE your toddler version of Mondrian! Johnny made a lovely colored pencil Mondrian in preschool recently 🙂
So glad you linked this up to Learning Laboratory – it’s a splendid Mondrian exploration!!!
I love this idea! It’s a wonderful way to introduce shapes and a terrific fine motor project! Thank you for sharing it. I plan to use it in my Getting Set For Kindergarten workshops this summer!!